So three weeks ago I was feeling creative and in the sewing mood. I thought about making myself a swimming suit but could not find any material that I liked enough. I was wondering through the material store and found the cutest fabric. The question..... What to make? I found some matchy colors and decided I would make another skirt. I did not want it to look like my other skirts though because I already had two of them and it was time for a harder project. This is the vision I had in my head:

(finished project)
INSTRUCTIONS ON HOW TO MAKE...
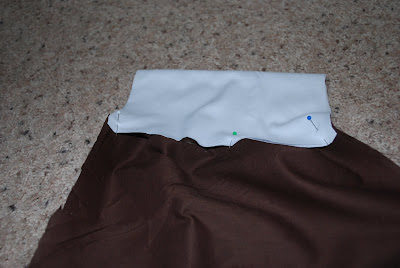
I just had to figure out how to make it. I started by cutting out panels that were 7 inches wide by 14 inches long. I sewed them all together alternating floral, brown, floral, green, floral brown, floral, green (sewing down the lengths. Then I did a really long stitch all the way across the top so I could gather the top. After I gathered the top I sewed the pink panel along the top, brown panel along the bottom, and brown panel on top of the pink. These panels are made by taking a length of fabric and folding them in half (hot dog style) with the good side of the fabric out (not in) then sew the unfinished length to the back of the skirt, this way you do not see the seems and you do not have to hem anything. You will not see any stitching when the skirt is done. It is all inside. Now I just needed a way to keep the skirt up. If you have read any of my previous posts you will know that I hate wearing skirts that give my lines around my stomach..... unfortunately I am not a size 6. So, I like to put Jersey knit on the top of my skirts that go to my natural waist (just like the Down East skirts). Also I can still wear them once I get pregnant. They are kinda like maternity pants but cute and not tacky. The white part is not seen when I wear them. It just holds the skirt up without giving my ugly lines. This part is done by measuring my natural waist. The rest of the skirt is bigger and wide enough for my widest parts (the line around butt). You then just take the jersey knit and lay it above of the rest of the skirt , mind you, the skirt is not sewn up the side yet so it is just a big rectangle. I am going to start using pictures with this cause this is the hard part. This is not the real skirt (just a miniature version so you get the concept) This is the same way I make my other skirts. The brown section I simply pleat first (with pins) on my other ones. On this one this is the upper bown panel that I am pinning it to.

with the jersey knit on top you line it up in the middle of the skirt. it should be several inches shorter then the rest of the skirt.
put a pin through the jersey knit and skirt right in the middle of both.

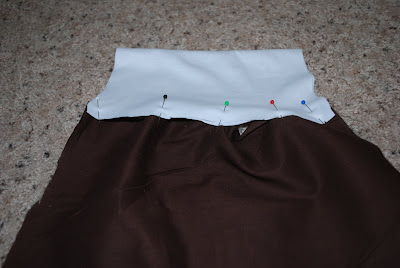
Then take the left end of the jersey knit and the left end of the skirt and pin them together.

Do the same on the right side.
Now comes the tricky part to try and explain.... take the left end and middle (where you put the first pin) and pull them so the jersey stretches and you can put a pin in the middle of the other two pins. Once you let go you will see it bunch back together. Do it on the right side as well and then it will look like this:
after this just fold the bottom part of the skit under the jersey and you are going to sew through the pins. as you sew though, you need to tug the knit so it is the same width as the bottom of the skirt (basically you tug it taught with skirt as you sew in-between the pins), you don't want to leave it gathered in-between or the brown will not fit you. It will be way to small. After this you fold the whole skirt in half and sew up the side (make sure it inside out so the seem ends up on the inside. Then you just trim all the seems (I use pinking shears so it does not fray). Then sew the buttons on the outside front, these are just for decoration.
If you really want to make this skirt just call me and I can better explain how to make it. I am the kind of person where this is all just in my head and really hard for me to explain how to do it without showing you. Most likely that is because I can't read instructions to figure things out. I have to just be shown if I can't figure it out. So it is hard for me to write instructions.
It was really fun to make and only took about 2 or so hours to make but my other skirts only take about 30 minutes. So it felt like a long time. There is just a lot more cutting, measuring and sewing. I love the finished project though. So cute....
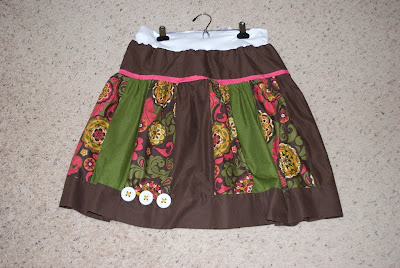
The top (jersey knit) is scrunched down, it is actually about 5 or 6 inches tall


